Your Account Still Had Money in It When the Position Was Closed
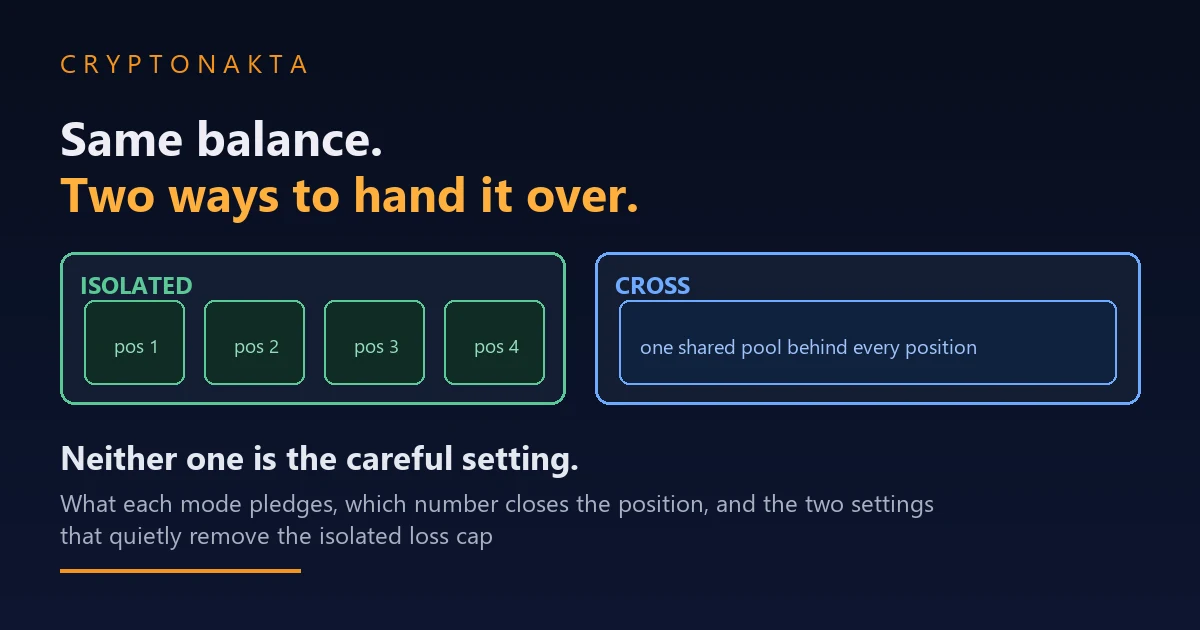
Isolated and cross margin decide which balance stands behind a position, which number the engine watches, and how far the damage is allowed to reach. Neither one is the careful setting.
Six things people believe about the margin mode switch, and what the risk engine is actually doing behind each one. Every row opens into a section below.
| What gets said | What the machinery does |
|---|---|
| “Isolated is the careful setting.” | It caps the loss on one position and caps the buffer holding that position up. The cap and the cushion are the same money, so the position dies at a nearer price. |
| “Cross gives you more room.” | It does, by pledging the balance that room is made of. The position survives further and the amount at stake is everything backing it. |
| “My other trade was fine, so why did it close?” | In cross mode the venue watches an account figure, not a position price. When that figure fails, positions get closed regardless of how each one was doing. |
| “Isolated means the rest of my money cannot be touched.” | True while the fence stays shut. Auto margin replenishment and unified account collateral are two documented ways it opens. |
| “My spot coins are separate from my trading.” | That depends on the wallet, not the switch. A unified account counts spot holdings as collateral at a published value ratio. |
| “Cross and isolated mean the same thing everywhere.” | In spot margin they describe borrowing, with interest and a margin level. In perpetuals there is no loan and no interest. |
The line to carry out of here: the switch does not make a position safer or riskier, it decides what you have handed over, and the wallet decides how much there was to hand over in the first place.
1. A position closed while the balance was still sitting there
2. The switch answers one question, and it is not about risk
3. Two modes, two objects: a position price and an account ratio
4. The cushion and the exposure are the same money
5. Offsetting, and the portfolio where it does nothing at all
6. Moving margin into a position, and the setting that does it for you
7. The wallet draws the boundary, the switch only divides it
8. When the collateral has a price of its own
9. Where the switch lives, and why it locks once you are in
10. The same two words in spot margin mean borrowing
11. Where the costs leave from, and what is left afterwards
12. The settings next to this one that answer different questions
13. Glossary: twelve terms that cover the whole subject
There is a particular kind of message that arrives in exchange support queues over and over. A position was closed. The trader looks at the screen afterwards and the account still shows a balance, sometimes a substantial one, sometimes more than the position itself was worth. Nothing about that looks like it should have happened. If there was money left, why did anything get closed? The answer is almost always the same, and it has nothing to do with a glitch. The number the venue was watching was not the one the trader was watching. In one margin mode the engine is looking at a single position and the collateral fenced off behind it. In the other it is looking at the account as a whole. Same market move, same balance, completely different verdict. This guide takes that switch apart: what each mode actually pledges, which number decides the outcome in each case, the two settings that quietly turn one mode into the other, and why the wallet your account uses matters more than the toggle itself. The mechanics of the forced close are covered separately in what actually triggers a liquidation, the recurring cost that eats margin between trades in funding, and if the vocabulary here is new, spot versus futures is the plainer starting point.
1. A position closed while the balance was still sitting there
Start with the moment the confusion happens, because it points straight at the mechanism.
Someone holds two positions. One is doing badly, the other is doing fine. The bad one gets closed out by the venue, which is not strange. Then the trader notices the good position was closed too. Or the opposite version: someone assigned a small amount of collateral to a position specifically so that a bad outcome would cost only that amount, and later found the account balance lower than the arithmetic allowed.
Both of those are the margin mode doing exactly what it says. Neither is a fault. And in both cases the trader had a mental model of the setting that was one step too simple: they thought the switch was labelled how much risk am I taking, when the label actually reads which balance is standing behind this position.
Those two questions produce very different answers to a very practical question: when the market moves against you, what is the first thing the venue measures, and what is it allowed to reach for?
- If the answer is only the collateral assigned to this position, the loss stops there and the liquidation arrives sooner, because there is less holding the position up.
- If the answer is the usable balance in the account, the position holds on much further, and the thing that eventually fails belongs to the account rather than to the trade.
Everything else here is a consequence of that one fork.
2. The switch answers one question, and it is not about risk
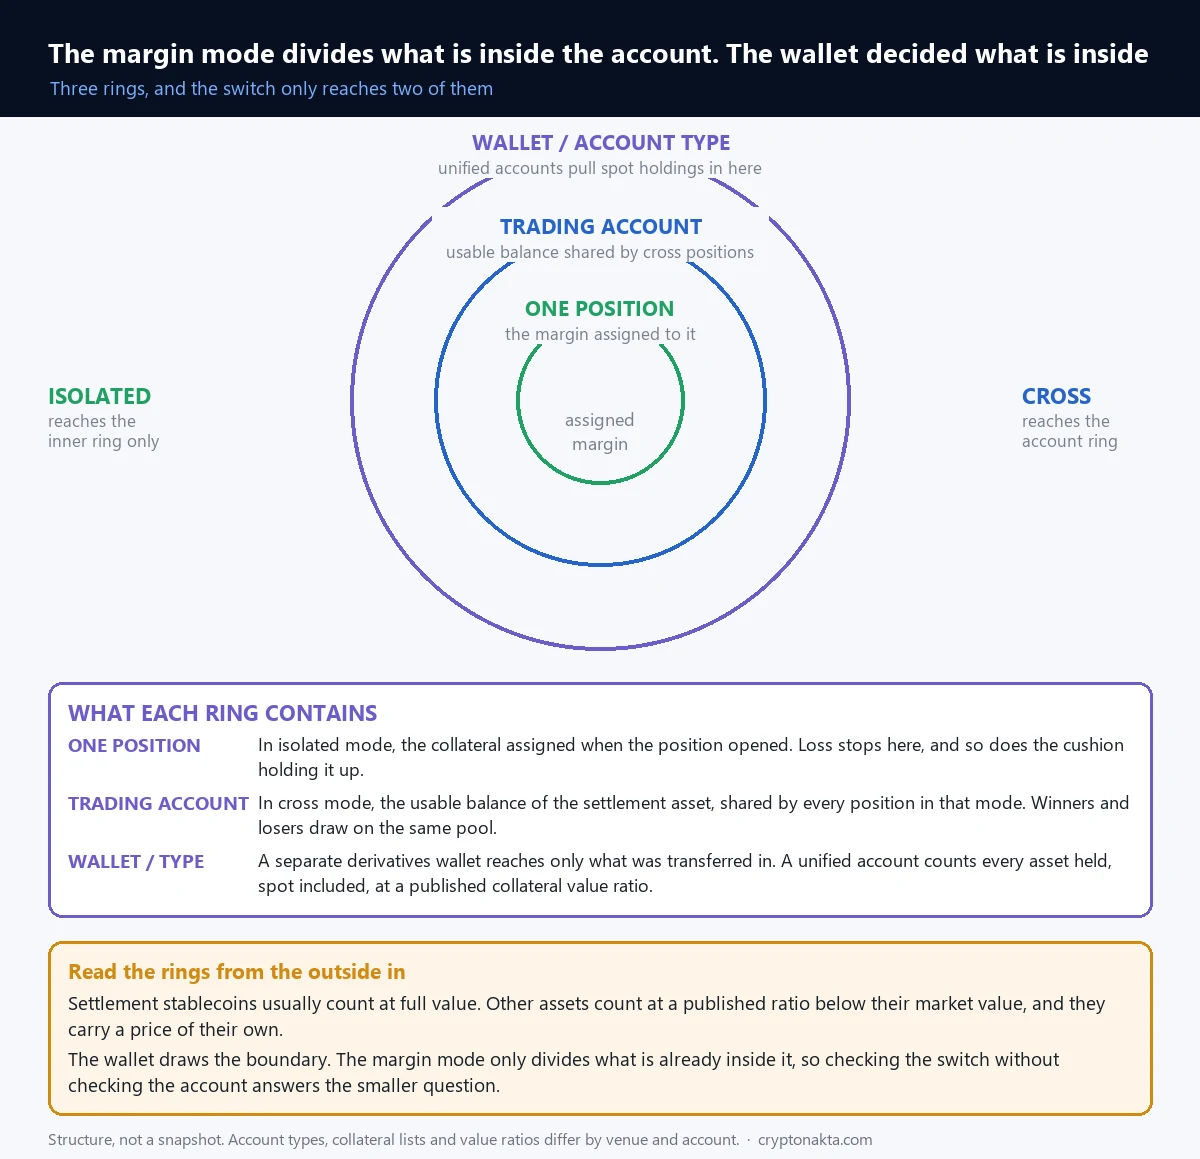
Strip away the marketing language on either mode and the switch answers a single question: which balance stands behind this position.
In isolated mode a defined amount of collateral is assigned to the position when it opens. That amount, plus or minus what the position has made or lost, is the entire resource the position has. Nothing outside it participates. Binance’s documentation puts it plainly for its margin accounts: margin in isolated mode is independent for each trading pair, and if margin needs to be added to a position it has to be added to that pair’s own margin, because the system will not automatically pull from other isolated positions.
In cross mode the position is backed by the usable balance of the settlement asset in the relevant account, shared with every other position in the same mode. There is no per position allocation to speak of. When the venue asks whether the position can still be carried, it adds up what the account holds and what every open position is currently worth, and compares that total against what the whole set of positions requires.
That difference in scope produces every other difference between the modes, and the list is longer than most people expect.
- What the venue measures when deciding to close something.
- How far the market has to move before that happens.
- What is at stake when it does.
- What you can do in the minutes before it does.
- What is left in the account afterwards.
- Whether other positions are affected at all.
Notice what is not on that list: anything about whether the trade was a good idea. The mode is a collateral arrangement. It has no opinion on direction, sizing or timing, and it cannot improve the outcome of a position that is wrong.
3. Two modes, two objects: a position price and an account ratio
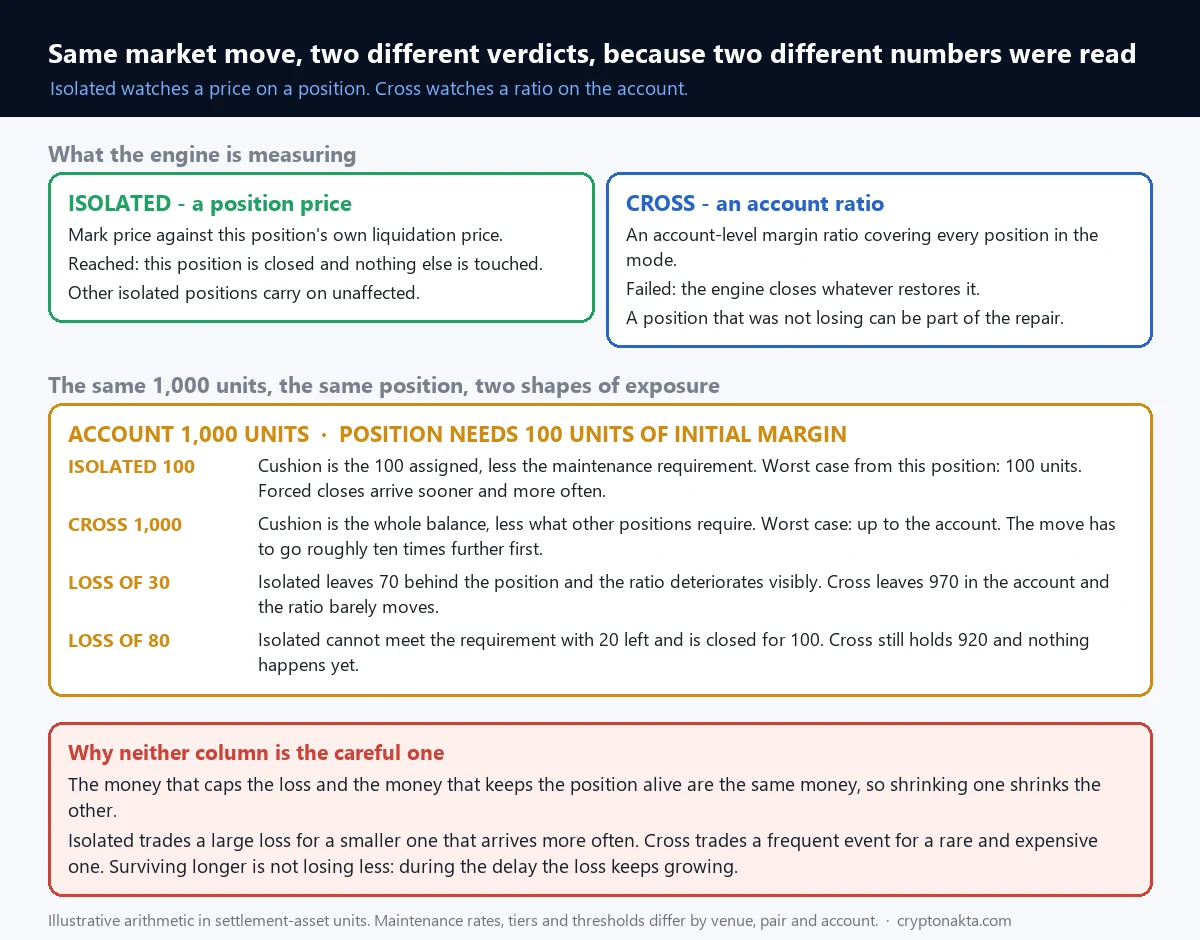
The clearest way to see the two modes apart is to ask what object the venue is watching. In one mode it is a price attached to a position. In the other it is a ratio attached to an account.
Isolated mode gives the position its own liquidation price. The venue tracks the mark price against that number, and when it is reached the position is closed. Everything else in the account carries on untouched, and Binance documents exactly that behaviour: a liquidation in one isolated position does not affect the others.
Cross mode has no such per position line to cross. Bybit’s unified account documentation is explicit about the contrast: liquidation is triggered when the account maintenance margin rate reaches one hundred percent, rather than when any individual position reaches a threshold of its own. The account level figure is the trigger. Positions are the things that get closed to fix it, and the engine picks them by what most reduces the problem, not by which one caused it.
| Question | Isolated | Cross |
|---|---|---|
| What the engine watches | Mark price against this position’s liquidation price | An account level margin ratio covering every position in the mode |
| What gets closed | This position | Whatever the engine needs to close to restore the account figure |
| Effect on other positions | None | They share the same pool, so they are part of the same event |
| Maximum loss from this position | The collateral assigned to it | Bounded by the account, not by the position |
| Displayed liquidation price | Moves only for reasons belonging to this position | Moves whenever anything else in the account moves |
That last row deserves its own paragraph, because it is the one that catches experienced traders as often as new ones. The liquidation price shown next to a cross position is not a fixed line drawn on the chart. It is a snapshot that assumes every other position in the account stays exactly where it is right now. Open another position and it moves. Let an unrelated trade slip into loss and it moves. Withdraw from the account and it moves. Traders who write that number down and treat it as a boundary are reading a variable as if it were a constant, and the number is at its least reliable precisely when the market is busiest, which is when several positions are moving at once.
In isolated mode the same number is far better behaved. It still moves, but only for reasons you can enumerate: collateral added or removed, funding settled against the position, or the position crossing into a different notional tier where the maintenance requirement steps up. That is covered in more depth in the liquidation article, and the tier behaviour is identical in both modes.
4. The cushion and the exposure are the same money
Here is the part that makes ranking the two modes impossible, and it is pure arithmetic rather than opinion.
The money that limits your loss and the money that keeps the position alive are the same money. You cannot shrink one without shrinking the other. Fence off a small amount of collateral behind a position and the most you can lose on it is that amount, which also means that is the entire cushion absorbing the move against you. The position runs out of room sooner and gets closed at a nearer price. Back the same position with the whole account and the cushion is enormous, the position survives moves that would have ended it several times over in the other mode, and the amount exposed is the whole account.
Work it through with round numbers, using units of the settlement asset so nothing here depends on a market price. An account holds 1,000 units. A position is opened that requires 100 units of initial margin.
| Isolated with 100 units assigned | Cross with 1,000 units in the account | |
|---|---|---|
| Cushion absorbing an adverse move | Roughly the 100 units, less the maintenance requirement | Roughly the 1,000 units, less what other positions need |
| How far the market can go against you | The nearer distance | Around ten times further, if nothing else is open |
| Worst case from this position | 100 units | Up to the account balance |
| Frequency of forced closes, all else equal | Higher | Lower |
| Size of the loss when one happens | Smaller | Larger |
Read the bottom two rows together. Isolated mode trades a smaller loss for a more frequent one. Cross mode trades a rarer event for a bigger one. Neither column is the safe column. They are two different shapes of the same exposure, and which shape suits a given person is a question about that person rather than about the engine, so this article does not answer it.
Two consequences follow that are worth stating out loud because they get lost in the comparison.
First, the loss cap in isolated mode is per position. Ten isolated positions are ten separate caps, and nothing caps their sum. A trader who feels protected because each individual position is limited can still lose the same total as someone in cross mode, just in instalments, and each instalment closes at a worse price than a cross position would have.
Second, surviving longer is not the same as losing less. Cross mode delays the point where a loss becomes final. During that delay the loss is still growing. When it finally resolves, the number is larger than it would have been at the earlier point. The room is real, and it costs what room costs.
5. Offsetting, and the portfolio where it does nothing at all
There is a reason cross positions hold on, and it is not that the venue is being generous. It is offsetting, and understanding it tells you exactly when cross mode helps and when it does nothing at all.
Unrealised profit and unrealised loss both flow into the same pool. A position in profit raises the account equity that a losing position is draining. In effect the winner is holding up the loser, without either trade being closed and without any transfer taking place. That is the entire mechanism. It is arithmetic on a shared balance, nothing more.
Which means the benefit exists only when the positions genuinely move differently.
- Opposite directions on related instruments. A long and a short that respond to the same market in opposite ways will produce offsetting profit and loss almost by construction. This is the case where cross mode meaningfully lowers what the account has to hold, and it is also the case where isolated mode would demand collateral twice, once for each leg, with neither leg allowed to help the other.
- Genuinely unrelated instruments. Some offsetting, some of the time, depending on what the market happens to be doing.
- Several positions that all move together. No offsetting at all. This is the important one.
That last case is worth dwelling on, because it is the most common portfolio there is and the one that looks most like diversification while behaving least like it. A basket of altcoin longs opened in cross mode is not several positions sharing risk. On a broad market move it is one position wearing several names. Every leg loses at once, the shared pool drains from every direction simultaneously, and the account level figure falls much faster than any single position would suggest. The trader watching individual liquidation prices sees each one still comfortably far away, right up until the account number fails and the engine starts closing.
Isolated mode does not have this failure. It also does not have the benefit: a hedged pair in isolated mode ties up collateral on both sides and the profitable leg cannot lend a single unit to the other. Same principle, opposite sign.
Knowing the mechanism is what lets you predict which of the two failure modes your own set of positions is exposed to.
6. Moving margin into a position, and the setting that does it for you
When a position is in trouble the options available differ by mode, and this is more practical than the philosophy of the switch.
An isolated position has an adjust margin control. Collateral can be pushed into an open position, which moves the liquidation price further away, and pulled back out, which brings it closer. The amount that can be withdrawn is not unlimited: the venue keeps back whatever the initial margin requirement demands and whatever unrealised loss the position is already carrying, so the removable figure shrinks as the position moves against you and disappears entirely before it is in real trouble. Adding is the more useful direction, and it is the one defensive action that exists in isolated mode and nowhere else.
A cross position has no such button, and the absence is logical rather than an omission. There is nothing to move funds between when the balance already backs everything. The equivalent action is depositing into the account, or closing something else, and either one raises the cushion under every cross position at once rather than under a chosen one.
Then there is the setting that blurs the line between the two, and it deserves to be understood before it is switched on rather than after.
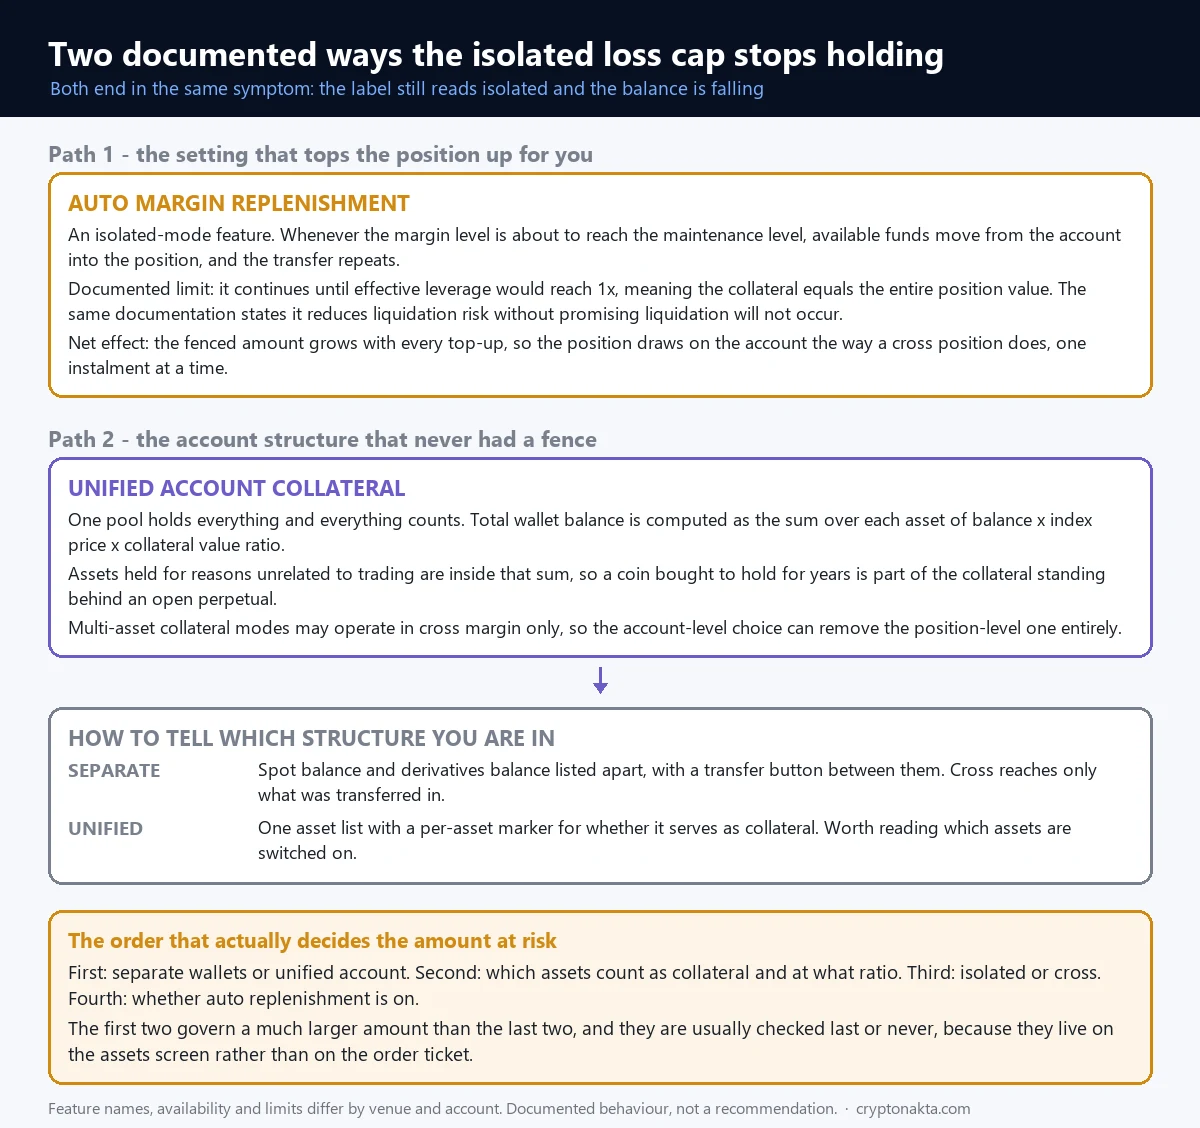
Bybit documents auto margin replenishment as an isolated mode feature. With it enabled, the system automatically transfers available funds from the account into the position whenever the margin level is about to reach the maintenance level, and it keeps doing that, continuing until the position’s effective leverage would reach one times, meaning the collateral behind it equals the entire position value. The documentation also states plainly that it reduces liquidation risk without promising that a liquidation will not occur.
Read that again with the earlier arithmetic in mind. The defining property of isolated mode is that the fence around the assigned collateral holds. Auto replenishment is a standing instruction to open the gate whenever the position gets close to failing. The position now draws on the account the way a cross position does, except it happens in instalments and each instalment is triggered by the position getting worse. A trader who chose isolated mode specifically to bound the damage, and then enabled a feature that unbounds it, has both settings working against each other, and the second one wins.
This is the single most common way the sentence my other funds are separate stops being true while the mode label on the screen still reads isolated.
7. The wallet draws the boundary, the switch only divides it
The second way it stops being true is bigger, and it sits one level above the switch entirely.
The margin mode divides collateral inside an account. It has nothing to say about what is inside that account in the first place, and that is decided by the account structure, which differs by venue and increasingly by product generation.
In the older arrangement, derivatives live in their own wallet. Funds have to be transferred in before they can be used, and cross mode reaches only what was transferred. Spot holdings sit somewhere else and are unreachable by the risk engine, not because of a setting but because of a boundary. In that arrangement, a trader who moves a defined amount into the derivatives wallet has drawn a hard line, and the margin mode operates entirely inside it.
Unified accounts remove that boundary by design, because removing it is the product. One pool holds everything and everything counts. Bybit’s unified account computes total wallet balance as the sum, over every asset held, of the asset balance times its index price times its collateral value ratio. Read that formula slowly: assets held for reasons that have nothing to do with trading are inside the sum. A coin bought to hold for years, sitting in the same account, is part of the collateral standing behind an open perpetual. The venue is not hiding this. It is the stated benefit, framed as capital efficiency, and it genuinely is efficient. It is also the answer to the question of how someone in isolated mode watched a long term holding get consumed.
So the order of operations is the opposite of how most people approach it. The wallet draws the boundary. The switch only divides what is inside. Checking the switch without checking the wallet answers the smaller question and leaves the larger one open.
There is a practical corollary that costs nothing to apply. Whatever your account structure, the amount at risk from trading is the amount inside the pool the risk engine can see. If that pool contains things you never intended to trade with, the mode setting will not fence them off, and no combination of toggles will. Where they live is a decision made when funds are moved, not when a position is opened. Related reading on keeping account access itself intact is in how exchange accounts actually get taken over.
8. When the collateral has a price of its own
Once collateral can be something other than the settlement asset, the collateral has a price of its own, and that introduces an exposure most people do not price in.
Venues publish a value ratio for each accepted asset. The settlement stablecoins usually count at full value. Everything else counts at less, and the reduction is the venue’s protection against the collateral falling while it is being relied upon. Bybit’s unified account applies a collateral value ratio per asset in the wallet balance calculation. Binance’s multi assets mode lets several coins back positions at a published value below their market value, and documents something worth noting on its own: that mode operates exclusively in cross margin. Isolated is not available inside it at all, which is a neat illustration of the hierarchy, since the account level choice removes the position level one.
| Collateral used | What changes | What to watch |
|---|---|---|
| Settlement asset only | Collateral value is stable against the requirement | Only the position moves |
| Major coin at a published ratio | Part of the value is discounted before it counts | The coin’s own price now affects your margin |
| Volatile asset at a lower ratio | A larger discount, and a more mobile collateral value | Both sides can move against you at once |
| Same coin as collateral and as position | Exposure is doubled in the same direction | A fall shrinks the margin and the position together |
The fourth row is the one that turns a bad day into a much worse one. If a coin is posted as collateral and the position is also long that same market, a decline reduces the value of the collateral while producing the loss the collateral is supposed to absorb. Nothing has malfunctioned. Two exposures that looked separate were the same exposure counted twice, and they arrive together.
The second order effect exists even without that overlap. In a broad decline every non stablecoin asset in the pool is worth less at the same moment, so the collateral side falls while the position side is already falling. A position that has not moved can be closer to trouble than it was an hour earlier, purely because the things backing it are worth less. That is why the margin ratio is a better thing to watch than the distance to a liquidation price.
9. Where the switch lives, and why it locks once you are in
The switch is not in the same place on every platform, and where it lives determines what you can actually do with it.
Binance futures applies the margin mode per contract. The documentation states that switching applies only to the selected contract, and that the mode cannot be changed while there are open orders or positions. That second clause matters more than it sounds. The choice is made before the trade, not during it, and a trader who wants to change their mind mid position has to close or cancel first, which means realising the situation as it stands.
Bybit’s unified account applies the selected mode to the whole account. A per pair choice does not exist there, so the decision is one decision covering everything, and changing it is an account level action rather than a per trade one.
OKX layers the choice under an account mode, with isolated and cross available inside it and portfolio margin as a separate risk model that computes the requirement from the whole portfolio’s worst case rather than adding up positions one at a time. Portfolio margin appears on several venues under similar names and generally requires a higher account tier, since the calculation assumes the holder understands what is being netted against what.
| Where the switch lives | What that means in practice |
|---|---|
| Per contract | Different pairs can run different modes at once. Easy to lose track of which is which. |
| Per account | One decision, applied everywhere, changed in one place. |
| Under an account mode | The account level choice can remove position level options entirely. |
| Locked while positions are open | The mode is chosen before entering, and is not a mid trade lever. |
| Portfolio margin as a separate model | The requirement comes from portfolio wide risk, not from summing positions. |
Two more places the mode gets set without anyone touching the futures ticket. Automated products carry their own. Binance documents both margin modes for its USDⓈ-M futures grid bots as a choice made when the bot is created, which means an account can be running positions in a mode its owner did not pick today. Copied positions work similarly, inheriting settings from the product rather than from your preferences. The exchange features overview and the copy trading article go through where those settings live.
Since tabs, labels and availability differ by account and by region, the reliable move is to read the setting on the screen in front of you rather than assume it matches a description written elsewhere.
10. The same two words in spot margin mean borrowing
One source of confusion has nothing to do with either mode and everything to do with vocabulary. The words cross and isolated also name two settings in spot margin trading, and the mechanism underneath is a different one.
Spot margin is borrowing. Assets are lent against collateral, the loan accrues interest by the hour, and the debt is repaid in the asset that was borrowed. The health measure is a margin level, which Binance defines as total asset value divided by total liabilities plus unpaid interest. As that figure falls, documented bands take effect in stages: first borrowing and transfers out are restricted, then a margin call, then liquidation of assets to repay the loan and the interest owed.
Perpetual futures margin is not a loan. Nothing is borrowed, no interest accrues, and the recurring cost is funding, which is exchanged between traders rather than paid to a lender. The health measure is a margin ratio comparing what backs the positions against what they require.
| Spot margin | Perpetual futures margin | |
|---|---|---|
| What happens when you open | An asset is borrowed | Collateral is committed, nothing is borrowed |
| Recurring cost | Interest on the loan | Funding, paid to or received from the other side |
| Health figure | Margin level: assets over liabilities plus interest | Margin ratio: requirement against what backs it |
| What ends it badly | Assets sold to repay the debt | Positions closed by the engine |
| What isolated means | Borrowing ring fenced to one pair | Collateral assigned to one position |
Both screens use the same two words for a collateral question and a debt question. Someone who learned the terms on one product and applies them to the other will be right about the general shape of isolated versus cross, and wrong about interest, about repayment, and about what the number on the screen is measuring.
11. Where the costs leave from, and what is left afterwards
Two smaller mechanics complete the picture, and both produce symptoms people misread.
Costs leave from wherever the position is backed. Trading fees and funding are debited from the collateral standing behind the position. In isolated mode that is the assigned margin, so every funding settlement nudges the liquidation price a little closer while the market has done nothing at all. A position left open across many settlements drifts toward its own line without a single adverse tick. In cross mode the same charges come out of the shared balance, so they lower the cushion under every position at once and show up as a slowly falling account balance rather than a moving line. Identical charge, different visible symptom. The size of that charge and how it is calculated is covered in the funding article.
What is left afterwards differs too. An isolated liquidation consumes the collateral assigned to that position. The clearance fee comes out of it, anything remaining returns to the account, and other isolated positions carry on, which Binance documents directly. A cross liquidation is an account level event: the engine reduces or closes positions until the account figure recovers, so a position that had nothing to do with the loss can be closed as part of the repair. Everything about the forced close itself, partial liquidation, the insurance fund and auto deleveraging, works the same way in both modes and is covered in the liquidation article.
Worth noting because it comes up constantly: the maintenance margin rate is set by the notional size tier of the position, not by the mode. Switching modes does not change what the position requires, it changes what is available to meet it.
12. The settings next to this one that answer different questions
Three settings sit near the margin mode in the same panel and get mistaken for it. They answer different questions.
Position mode decides whether opposite orders net out. One way mode holds a single net position per contract, so an order in the opposite direction reduces or reverses what is there. Hedge mode holds a long and a short on the same contract simultaneously, each with its own entry and its own margin. That switch is about whether positions cancel each other. The margin mode is about what backs whatever positions exist. Changing one tells you nothing about the other, and hedge mode combined with isolated margin means collateral committed twice with no offsetting between the legs.
Leverage sets the initial margin required to open a given size. It does not set the maintenance requirement, which comes from the notional tier, and it does not change what the mode pledges. Two positions in different modes at the same leverage require the same initial margin and behave completely differently afterwards.
Order settings such as reduce only, trigger price source and time in force belong to the instruction, not to the collateral. They are covered in the order types article, and the one relevant overlap is worth stating: a stop is a way to leave a position, which is a different tool from a margin mode, and neither one substitutes for the other.
If a single habit is worth taking from all of this, it is to look at the margin ratio rather than the distance to a liquidation price. The ratio is the number the engine acts on in cross mode, it is the number that deteriorates when collateral value falls, and it is the number that keeps moving while the position sits still. The liquidation price is a derived figure that assumes everything else holds constant, and in the moments that matter, nothing else is holding constant.
Labels and layouts differ by platform. The exchange comparison covers where these settings sit, and how to tell whether a venue is worth using covers the checks worth making first.
Binance

Bybit

Gate.io

Affiliate disclosure: some links are partner links. We may earn a commission at no extra cost to you. This is not investment advice.
13. Glossary: twelve terms that cover the whole subject
Twelve terms that cover the whole subject. Everything above is these words in sentences.
| Term | What it means here |
|---|---|
| Margin mode | The setting that decides which balance stands behind a position: the collateral assigned to it, or the account. |
| Isolated margin | A defined amount of collateral assigned to one position. The loss stops there, and so does the cushion. |
| Cross margin | The account’s usable balance backing every position in the mode, shared between them. |
| Margin ratio | The health figure comparing what backs positions against what they require. The number the engine acts on. |
| Maintenance margin | The minimum that must remain behind a position. Set by the notional tier, unaffected by the mode. |
| Offsetting | Unrealised profit on one position supporting unrealised loss on another through the shared pool. |
| Auto margin replenishment | An isolated mode setting that moves account funds into a position automatically as it approaches the maintenance level. |
| Unified account | An account structure where one pool of assets, including spot holdings, serves as collateral across products. |
| Collateral value ratio | The published proportion of an asset’s market value that counts as collateral. Stablecoins usually full, others less. |
| Portfolio margin | A separate model that derives the requirement from the whole portfolio’s worst case rather than position by position. |
| Position mode | One way or hedge. Decides whether opposite orders net out. Unrelated to what backs them. |
| Margin level | The spot margin health figure: total assets over liabilities plus unpaid interest. A borrowing measure, not a futures one. |
FAQ: the questions that follow an unexpected close
Compare exchanges: margin modes, account structure and what to check first